TLS with S3 static websites
It’s been quite a while since I set up my blog using AWS S3’s static website hosting and while it’s been great so far, there’s one long-overdue feature I’ve been missing: transport encryption. I’m ashamed it’s taken me this long to add it, but it’s now available and you can learn how to set it up yourself!
But perhaps most importantly, you can see all the problems I faced and avoid all the mistakes I made.
Architecture
Up to now, I’ve just been serving HTTP requests directly from an Amazon S3 bucket that’s been configured as a static web host. However, S3 static websites aren’t able to support HTTPS. To get HTTPS working, I could set up a reverse proxy such as nginx to handle this, but instead I’m going to use Amazon CloudFront.
One of the benefits of using CloudFront is that it can cache static resources for us ‘at the edge’, using up to 169 different physical endpoints (depending on the availability tier selected). This will greatly improve the performance of my website for viewers around the world.
The only missing piece here is the TLS certificate we’ll use to do the encryption in CloudFront, and verify that we own and control our domain name. We’re able to take care of this using AWS Certificate Manager.
Setting it up
TLS certificate
-
Log into the AWS console and navigate to the AWS Certificate Manager admin panel. If you’re like me and have never used Certificate Manager before, you’ll see a welcome screen with a couple of icons.
Note: You must change your console region to
us-east-1(US East, N. Virginia), or the certificates we generate won’t work in CloudFront. - Under the ‘Provision certificates’ icon click Get started.
- Select Request a public certificate from the two options shown, then click Request a certificate.
-
You’ll be asked to enter the fully-qualified domain names (FQDNs) that will be on the certificate, such as
contoso.netandblog.contoso.net.Tip: You can use a single asterisk to match ‘any name’, so if you have a bunch of subdomains you can match all of them (and any future additions) by using
*.contoso.net.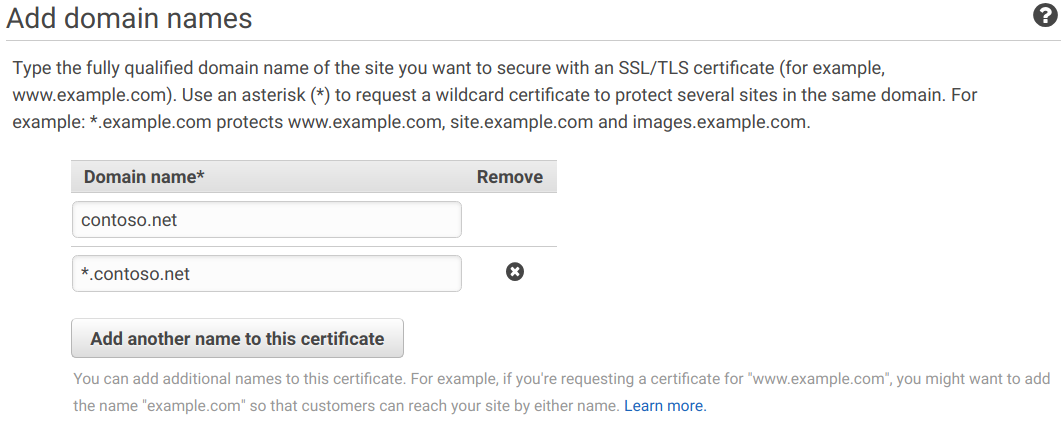
- When you’ve added your domain(s), click Next.
- You’ll be asked whether you want to use DNS validation or email validation to prove you own or control the domains listed. I chose DNS validation. Click Review.
- Amazon will provide a summary page listing the domain names you want to secure and your validation method. Click Confirm and request if you’re happy with the info.
-
Amazon will think for a few moments, before providing
CNAMErecords that must be set on the domains you have provided. Depending on your DNS provider, the instructions to do this will vary.Tip: While you can technically delete the
CNAMErecords after the certificate is issued, leaving them there means Amazon can automatically renew your certificates when they come close to expiry.
That’s it! It will take a little while for Amazon to discover your new CNAME record; it took about five minutes for me.
CloudFront
Now we have our encryption certificate, we can set up CloudFront.
- Log into the AWS Console and navigate to the CloudFront admin panel.
- I haven’t used CloudFront before, so there was a message telling me to set up a distribution. Just click the big blue Create Distribution button.
- We’re serving web files, so click Get Started under the ‘Web’ heading.
- Now we need to fill in a bunch of form fields.
-
Origin Domain Name: This is the full URL of our bucket (such as
blog.contoso.net.s3-website-ap-southeast-2.amazonaws.com). It should create an auto-fill dropdown when you click in the box. -
Viewer Protocol Policy: I picked
Redirect HTTP to HTTPS. -
Compress Objects Automatically: I picked
Yes. This will reduce network overhead, should make pages load quicker for viewers, and is less expensive for you (as costs are incurred based on the quantity of data transferred). -
Price Class: I went with
Use Only U.S., Canada and Europeas it’s the cheapest tier and I’m not too concerned about latency. -
Alternate Domain Names (CNAMEs): Put in your domain names here (for my example,
blog.contoso.net). - SSL Certificate: Pick Custom SSL certificate and use the one created in the previous heading.
-
Default Root Object: I put
index.html; if you leave this out, you may get either aListBucketResult(like I did) or anAccessDeniederror. - The other settings are fine to be left at their defaults.
-
Origin Domain Name: This is the full URL of our bucket (such as
- Click Create Distribution.
Another step done! It will take a while for for CloudFront to mirror your S3 bucket to its edge nodes. In my case it took about 40 minutes, but I was playing with settings while it was working so it’s possible this is longer than usual.
Updating the domain
At this point, we have a shiny new TLS certificate to verify that we own our domain and encrypt traffic to and from it; and we have our website mirrored in CloudFront in a bunch of places around the world.
Tip: If you’re following these steps for yourself, I’d recommend leaving this heading until after you’ve fixed the bugs described in the headings below.
The only thing left to do is point our blog.contoso.net domain at the CloudFront address. This is a very similar process to adding the CNAME record in the first heading; this time, we’re using the Domain Name that CloudFront provides us and putting it in as another CNAME record for our subdomain.
If you followed my earlier article you’ll already have a CNAME set up for this purpose, we can just change the value from the s3-website address into our cloudfront.net address.
You can be sure it’s working when you see that glorious little green padlock in the URL bar when you visit your domain:

Oh no, there’s bugs
At this point, I thought my website behaved exactly the same way as before, just with HTTPS. However, I quickly ran into a couple of issues:
- 404 pages are broken. I’ve set up a custom 404 handler page in S3’s static website hosting option, but this isn’t respected by CloudFront. These errors now just give you a cryptic
AccessDeniederror in XML. - Navigating to a folder (eg
/categories/) doesn’t automatically fetch theindex.htmlfile inside it. It instead gives you the same error as in the previous dot point.
Some research indicated the quick-and-dirty solution was to change the origin for the CloudFront distribution from the internal S3 bucket reference, to the external S3 static-website URL. This gives you all the benefits of S3’s URL rewriting (for folder indexes) and 404-page handling, with all the benefits of CloudFront’s distribution network and HTTPS. Sounds perfect, right?
Except there’s a catch — CloudFront will serve HTTPS to your viewers, but it’s actually fetching content from your S3 bucket over unencrypted HTTP! This might not be a big deal for some of you, but I’d like my traffic to be encrypted end-to-end (and also remove direct public access to the bucket).
Fixing HTTP errors
We can resolve a lot of the HTTP errors by creating a ‘Custom Error Response’ in our CloudFront distribution.
- Log into CloudFront and click on the ID of your distribution in the list.
- Click on the Error Pages tab, then click Create Custom Error Response.
- In the ‘HTTP Error Code’ box, pick
403: Forbiddenand set ‘Customize Error Response’ to Yes. - In the ‘Response Page Path’ box, put in
/404.html(or whatever your static 404 page is named). Select404: Not Foundin the ‘HTTP Response Code’ box. - Click Create.
Tip: While we’re serving a 404 page to our visitors, CloudFront internally receives a 403 error from S3. This is why we set ‘HTTP Error Code’ to 403 instead of 404.
Fixing directory indexes
There’s two ways we can fix directory index.html files not being served. We can either:
- Rename folder indexes like
/categories/index.htmlto the extension-less file/categories; or - Use Lambda@Edge to rewrite requests for directories into their
index.htmlfiles.
Renaming the S3 records is cheap but involves a post-processing step that can clutter up your bucket (depending on your workflow); while Lambda@Edge can increase your costs depending on how many times it needs to run.
I chose to play around with Lambda@Edge, based on a blog post from Amazon.
-
Once you’ve created your CloudFront distribution, you’ll need to go to the Lambda console.
Note: As before, you’ll need to change your console region to
us-east-1(US East, N. Virginia). - Click the orange Create function button.
- You should see a row of three options above a form; ensure Author from scratch is selected.
- In the form, enter a function name and choose
Node.js 8.10for the Runtime. I chose to name my functionCloudFront-S3-index-files.
- Expand the Choose or create an execution role link.
- Set Execution role to
Create a new role from AWS policy templates. - Enter a Role name similar to your Function name. I chose
CloudFront-S3-index-files-role. - In the Policy templates box, select
Basic Lambda@Edge permissions.
- Set Execution role to
- Click Create function. Amazon will think for a few moments, before dropping you into the Lambda editor.
-
In the editor at the bottom, copy and paste the following code:
'use strict'; exports.handler = (event, context, callback) => { var request = event.Records[0].cf.request; var oldUri = request.uri; var newUri = oldUri.replace(/\/$/, '\/index.html'); console.log("Old URI: " + oldUri); console.log("New URI: " + newUri); request.uri = newUri; return callback(null, request); }; - Click the orange Save button in the header.
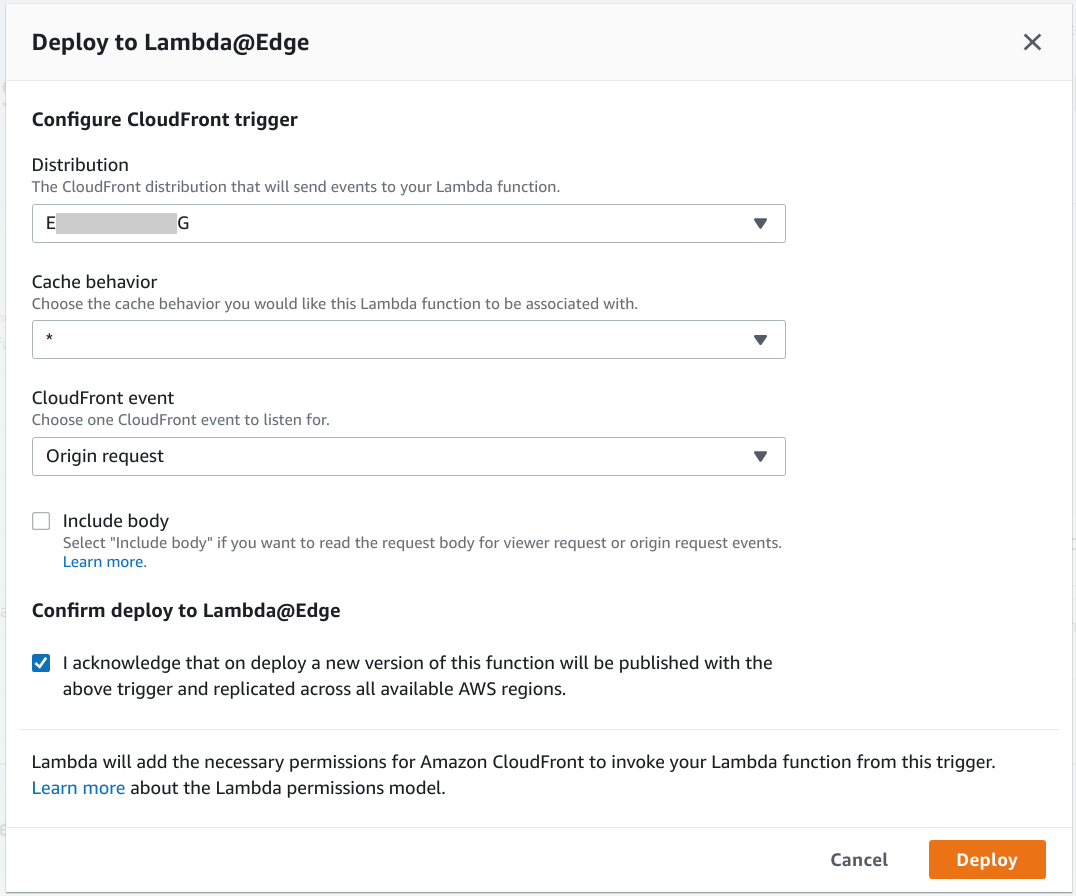
- Looking at the ‘Designer’ part (top half) of the form, click CloudFront in the menu on the left.
- The bottom half of the form will ask you to configure the trigger — click Deploy to Lambda@Edge. A modal dialog will pop up, asking for some more information.
- Distribution: Pick the ID of the CloudFront distribution we created earlier
-
Cache behavior:
* -
CloudFront event:
Origin request - Check the
I acknowledge ...box. - Click Deploy. The modal will close and you’ll be returned to the editor.
You’re done! The Lambda should be effective immediately, and you can test it by visiting one of your directory pages (like /categories/ in my case).
Wrap up
Wow, we’re finally done. Our site is now neatly protected by TLS, we have the added benefit of improved performance for a fair chunk of the world, and we resolved a bunch of confusing and time-consuming problems we encountered along the way.
The one final issue you might encounter from here on out is around ‘invalidating’ cache content: if you delete or modify a file in your bucket, the CloudFront nodes might not necessarily pick up on this change straight away.
We can tell CloudFront to invalidate files manually in a few different ways; if, like me, you’re using s3cmd sync to push your site into a bucket, the easy option is tacking on a --cf-invalidate parameter1. This will handle cache invalidate for any files changed by the sync operation (you might need to add some additional policies to the IAM user you’re using to sync).
-
There is currently a bug in the latest release, but it has been fixed awaiting the next version. ↩