NFC fun with Python
I’ve recently been looking into using an NFC reader/writer pad at work to make configuring some devices we have much quicker and easier, as the standard process for these devices is an Android phone and a lot of manual data entry. Checking the device using a mobile is great, but configuring them this way is not scalable.
Setup
The hardware
I did some research and found we could get an NFC pad and write some Python code using nfcpy to automate much of the labour, reducing the time taken and decreasing the likelihood of human error. Some quick searches on eBay showed that the ACS ACR122U was a reasonably cost-effective option, so I ordered a couple of units for testing.1
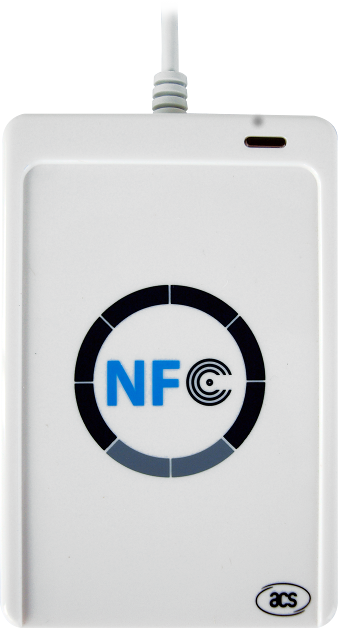
When they arrived, I unpacked one and powered it up — so far, so good. Linux seems to have a basic driver for it that makes it beep when you bring a card near (at least that’s all I could get it to do). It’s also a fairly powerful reader — mine was able to communicate with test tags up to 50mm away, including through 25mm particleboard.
The next step is getting the reader working with Python.
Using the reader with nfcpy
At this point, I immediately encountered problems. The most recent version of nfcpy does not support Python 3. In particular, there a number of places where it treats str and bytes types the same, which is no longer the case. My options were to move back to Python 2, port the module to Python 3 or abandon the idea entirely — I decided to try and port the library to Python 3. I’ve spent a fair amount of time on it so it can work for my device; feel free to grab the code from my fork, but be aware it might not work for you out-of-the-box.
Part way through this process, I also discovered that nfcpy has this to say of the ACR122U:
It can not be overstated that the ACR122U is not a good choice for nfcpy.
So, yeah. The lesson for me here is do (better) research before I commit to a plan. I hope you’ll learn from my mistake.
Linux device access issues
While porting the code, I also hit upon the issue of the device being locked out, so Python couldn’t use it. Some research led me to running python -m nfc, which helpfully reports that it’s a kernel module causing the problems:
** found usb:072f:2200 at usb:001:008 but it's already used
-- scan sysfs entry at '/sys/bus/usb/devices/1-1:1.0/'
-- the device is used by the 'pn533_usb' kernel driver
-- this kernel driver belongs to the linux nfc subsystem
-- you can remove it to free the device for this session
   sudo modprobe -r pn533_usb
-- and blacklist the driver to prevent loading next time
   sudo sh -c 'echo blacklist pn533_usb >> /etc/modprobe.d/blacklist-nfc.conf'
As indicated, a temporary fix is running sudo modprobe -r pn533_usb; or for a permanent solution blacklist the module:
$ sudo sh -c 'echo blacklist pn533_usb >> /etc/modprobe.d/blacklist-nfc.conf'
Wireshark USB analysis
Part way through migrating the module to Python 3, I started encountering issues where the nfc-poll command on Linux would work fine, but Python was indicating that the NFC chip wasn’t responding with enough data. This seemed a little bit suspect to me, so I decided to crack out Wireshark to do some USB sniffing and find out where the differences were.
Linux permissions
Wireshark can capture data from USB devices using the various usbmon adapters. Unfortunately the permissions on these are by default pretty locked down on Linux, so some searching led me to this helpful SuperUser post. The temporary hack to fix this involves granting everyone read and write access to the file: sudo chmod o=rw /dev/usbmon1.
Tip: If you’re missing /dev/usbmon* files, chances are you haven’t loaded the kernel module — run sudo modprobe usbmon. Following the instructions below will take care of this for you automatically from this point onwards.
A more robust solution is to create a usbmon group and tell the udev daemon to grant appropriate access. These instructions add you to the newly-created group; you’ll need to logout for the group changes to take effect (or you can try your luck with these instructions).
$ sudo addgroup usbmon
$ sudo usermod -a -G usbmon $USER
$ echo 'SUBSYSTEM=="usbmon", MODE="640", GROUP="usbmon"' | sudo tee /etc/udev/rules.d/99-usbmon.rules
$ echo 'SUBSYSTEM=="usb", RUN+="/sbin/modprobe usbmon"' | sudo tee /etc/udev/rules.d/99-usbmon.rules
$ sudo udevadm trigger
Opening a USB capture
You might have a number of usbmon devices that Wireshark can attach to. To work out which one you need, run lsusb and look for your device. The Bus number (001) means that we will use usbmon1.
Bus 001 Device 020: ID 072f:2200 Advanced Card Systems, Ltd ACR122U
Depending on what other devices are on the bus you’re capturing on, you could be flooded by traffic pretty quickly. You can reduce what is shown using a display filter of usbccid (to jump straight to the display filter box in Wireshark, press Ctrl+/).
Dissectors and filtering
Wireshark should now be capturing USB traffic and looking for CCID packets to display. Chances are, there might not be anything there right now. We can get some messages to appear in Wireshark by running the nfc-poll command in a terminal; it will look for your NFC card reader and interrogate it. To get some informative output, put an NFC card on the top of the reader before you run the command. Here’s output from when I ran it:
nfc-poll uses libnfc 1.7.1
NFC reader: ACS / ACR122U PICC Interface opened
NFC device will poll during 30000 ms (20 pollings of 300 ms for 5 modulations)
ISO/IEC 14443A (106 kbps) target:
    ATQA (SENS_RES): 00  04
       UID (NFCID1): fc  09  2e  06
      SAK (SEL_RES): 08
nfc_initiator_target_is_present: Target Released
Waiting for card removing...done.
Once Wireshark has captured some USB traffic, you can take a look through it to try and spot any issues. Unfortunately, it doesn’t tell us much about the content of the messages by default. We can tell Wireshark that we know the messages are from an ACR122U device by changing the decoding.
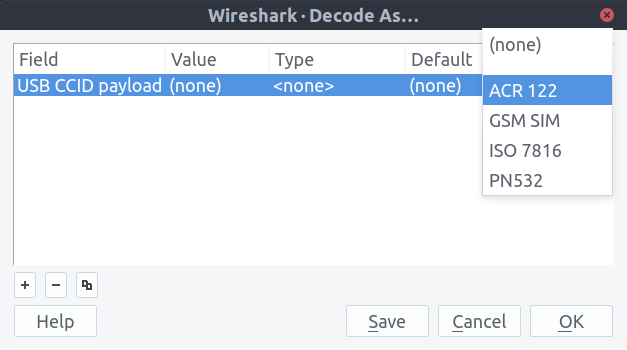
If you’ve got rows with USBCCID in the Protocol column, just right click one of them and select ‘Decode As…’ in the context menu. A dialog will open with a table with one row. Change the (none) in the ‘Current’ column to ACR 122, then click OK:
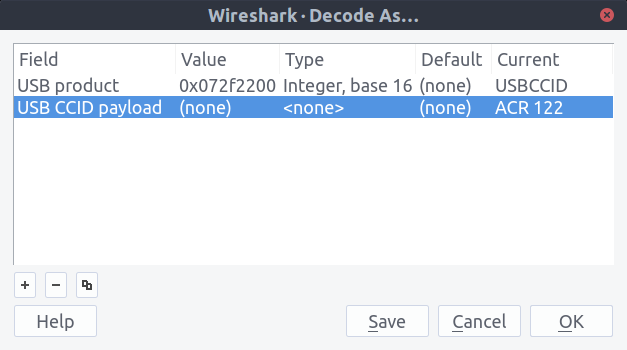
On the other hand, if you don’t have any USBCCID rows we can still get the same result. Just right click one of the USB rows and pick ‘Decode As…’ in the context menu. In the USB product row, change the (none) in the ‘Current’ column to USBCCID. Then click the plus button and pick USB CCID Payload in the dropdown in the first column. Then you’ll be able to select ACR 122 like above:
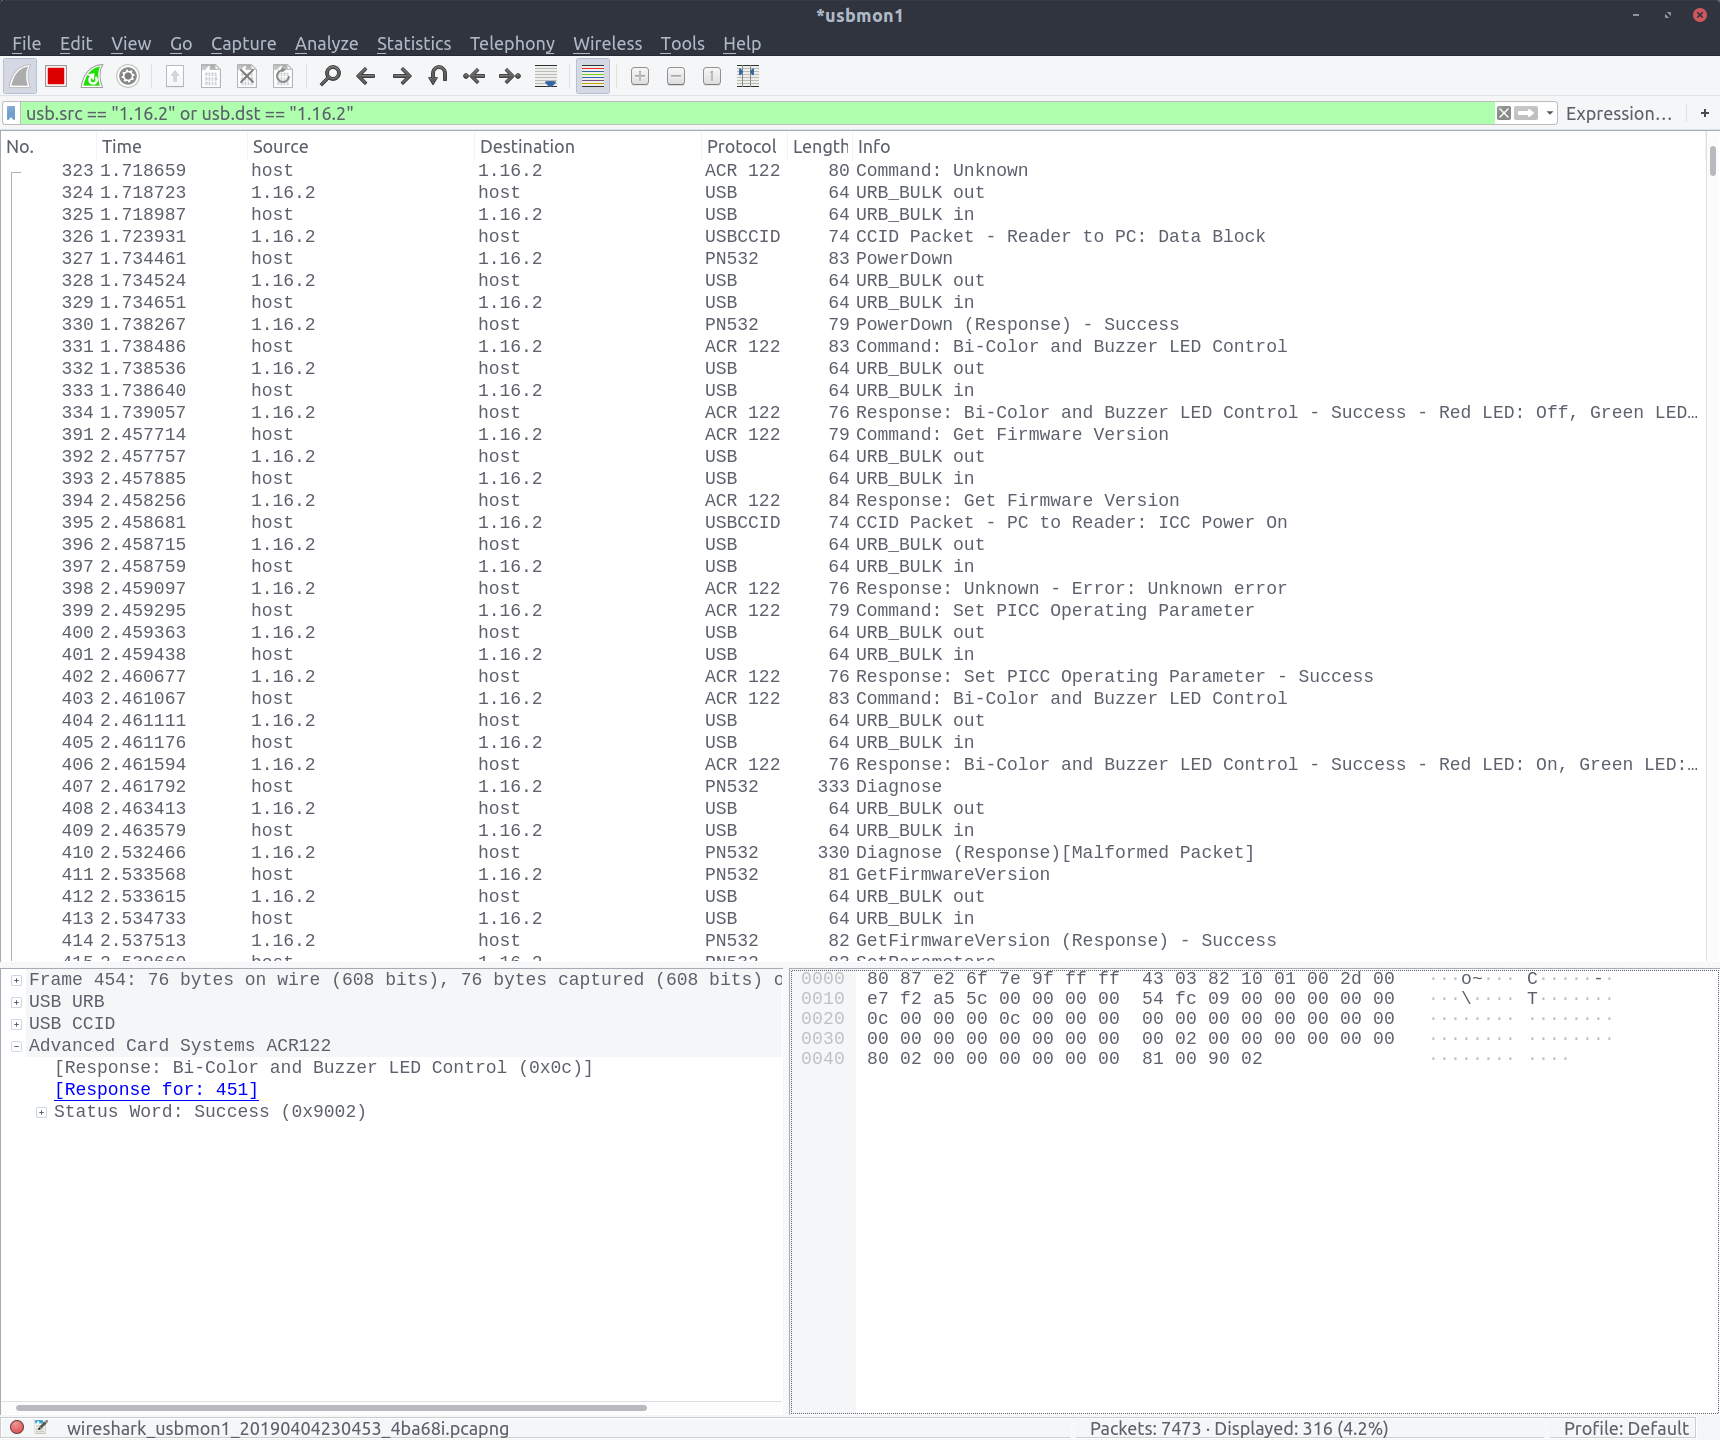
Wireshark will now be able to work out exactly what commands are being sent to the NFC reader and chipset — you can check the ‘Protocol’ column in the packet list. I’d recommend taking a couple of minutes to click through the packet list and get an idea of what’s going on.
Fixing the bug
After capturing known-good traffic from nfc-poll and comparing it with the output from Python, I could immediately see where the messages diverged:
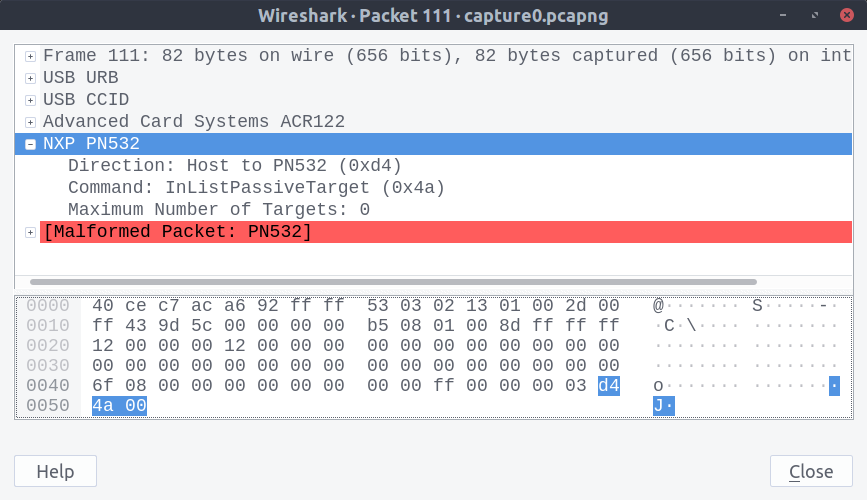
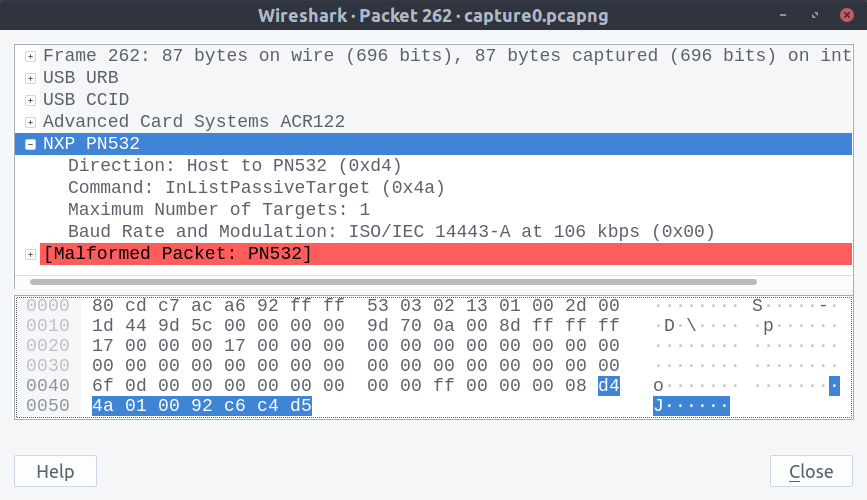
The Python packet wasn’t being constructed properly. Some clever hunches with the debugger and breakpoints revealed the source of the error: my attempts at migrating the Python 2 code to Python 3. The original source includes this line:
# brty is type int, initiator_data is type bytearray
data = chr(1) + chr(brty) + initiator_data
Which is no longer valid Python (you can’t concatenate str and bytearray objects). I’d migrated it to look like this:
data = bytes(1) + bytes(brty) + initiator_data
Once I realised there was a problem here, I decided to actually read the documentation, which told me exactly what I should have known all along:
In addition to the literal forms, bytes objects can be created in a number of other ways:
- A zero-filled bytes object of a specified length:
bytes(10)- From an iterable of integers:
bytes(range(20))
So where I was trying to create a bytes object of length 1 containing the value brty, I was instead creating a bytes object brty elements long with each element set to zero (the same bug is present with bytes(1)). The easy fix is to make the arguments into iterables: lists or sets. The correct code now looks like this:
data = bytes([1, brty]) + initiator_data
Next steps
Success, right? Not really. The Python 3 port is still incomplete at time of writing and there’s a number of fixes to be made, but progress is definitely underway and it looks like this device is capable of doing what I need it to (but not much more). Once I have the code working for my intended application, I might buy a more capable reader for some further experimentation.
Next week I hope to finish the project for work and provide some code for you that demonstrates how to read and write smartcards.
-
Image sourced from Advanced Card Systems ↩